- The Core Components: Symbols, Collections, and Logs
- The Monthly Log: Setting Your Intentions
- The Daily Log: Your Everyday Companion
- The Weekly Spread: Bridging Daily and Monthly
- Collections: Your Dedicated Topic Pages
- Customization and Personalization: Making It Yours
- Frequently Asked Questions
- What is the most important part of the bullet journal method?
- Do I need special supplies to start bullet journaling?
- How much time does it actually take to bullet journal?
- I’m not artistic. Can I still bullet journal?
- Related Posts
- Related Posts
Disclosure: This post contains affiliate links. If you click through and make a purchase, we may earn a small commission at no extra cost to you. Thank you for supporting this site!
Have you ever stared at a blank notebook page, feeling a mix of excitement and intimidation, wondering how those perfectly organized, visually stunning bullet journal spreads come to life? I certainly have. Over the past 7 years, I’ve filled more than 20 journals, from minimalist daily logs to elaborate monthly spreads, and let me tell you, the magic isn't in some secret artistic talent. It’s in a simple, adaptable system designed to bring clarity and intention to your life. The bullet journal method, created by Ryder Carroll, isn't just about pretty layouts; it's a mindfulness practice disguised as a productivity tool. It’s about helping you track the past, organize the present, and plan for the future. I've made my share of mistakes—scribbled-out spreads, over-ambitious trackers that lasted a week, and color palettes that clashed spectacularly. But through it all, I learned what works, what doesn't, and how to tailor this flexible system to *my* life. Today, I want to share that hard-won knowledge with you, breaking down the core components and showing you exactly how to build spreads that are both functional and beautiful, no matter your skill level. We’ll cover everything from the foundational symbols to creating layouts that truly serve you, with plenty of practical tips and inspiration along the way.
The Core Components: Symbols, Collections, and Logs
At its heart, the bullet journal method relies on a few key building blocks that make it so incredibly versatile. These aren't rigid rules, but rather a framework. The most fundamental are the symbols: rapid logging. This is where you use simple marks to denote tasks, events, and notes. A dot (•) for a task, a circle (○) for an event, and a dash (—) for a note. When a task is completed, you strike through the dot (x). If it’s migrated, you use an arrow (>). I found that sticking to these basic symbols, at least initially, was crucial for keeping my logs quick and efficient. I tried adding more complex symbols early on, like a star for something important, but it just slowed me down. The beauty is in the simplicity. Beyond rapid logging, you have Collections. These are simply pages dedicated to specific topics – a wishlist, books to read, project notes, or even a list of your favorite coffee shops. I have a dedicated Collection for gift ideas that spans several pages, and it’s been a lifesaver during the holidays. Finally, the Logs: Daily, Weekly, and Monthly. These are the workhorses of your journal, where you’ll apply your rapid logging and collections.
The beauty of the bullet journal method is its adaptability. Ryder Carroll himself emphasizes that it's a tool for you to design. This means you can absolutely customize the symbols. Some people use a square ([ ]) for tasks, and an asterisk (*) for important notes. I’ve seen people use little icons that represent their personal style! The key is consistency within your own journal. If you decide a triangle (△) means “call,” always use that triangle for “call.” When it comes to Collections, the sky's the limit. I’ve dedicated entire spreads to tracking my houseplants' watering schedules (with little leaf icons!), brainstorming blog post ideas, and even mapping out my personal budget. For instance, my “Future Log” – a spread to note down events and tasks months in advance – is typically 4 pages, each measuring roughly 14cm x 20cm (half of a standard A5 page). This gives me ample space to jot down birthdays and appointments without cluttering my current monthly view. The logs are where you bring it all together, and we'll dive into those next.
The Monthly Log: Setting Your Intentions
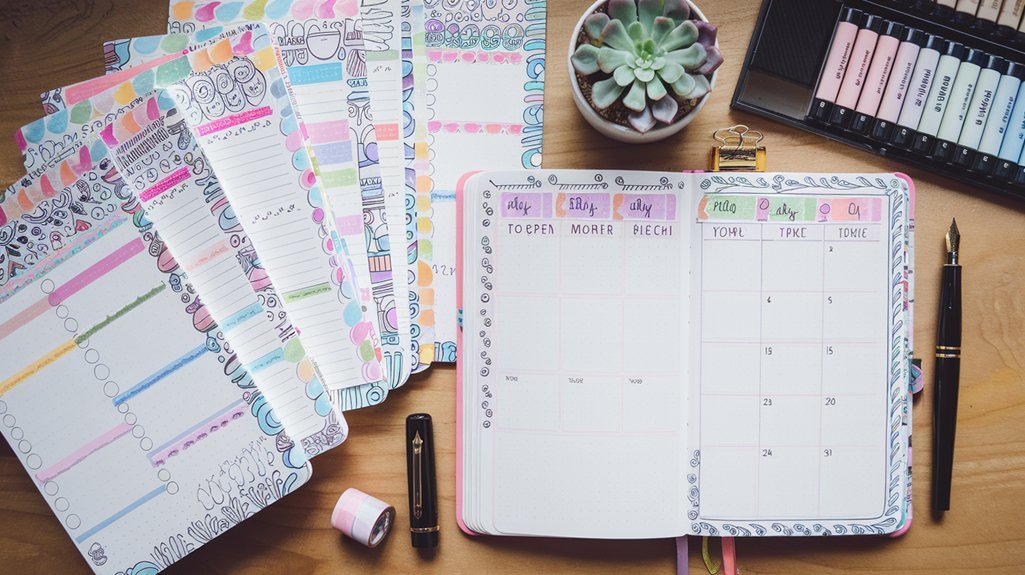
The Monthly Log is your bird's-eye view for the entire month. It typically consists of two parts: the Calendar and the Task List. The Calendar section is a simple overview of the month, listing each day with its corresponding number. This is where you'll jot down appointments, birthdays, and events. For an A5 journal (typically 14.8cm x 21cm), I usually dedicate two facing pages. On the left page, I'll write the month and year at the top, then divide the page into 31 horizontal sections, each about 1.5cm high and spanning the width of the page. On the right page, I list the days of the week vertically, with space next to each to write the date. This way, I can quickly see what day of the week a specific date falls on. My go-to pen for this is a Tombow Dual Brush Pen in a soft grey (like 942) for the calendar grid, and a black Micron 05 for writing in the dates and events.
The Task List section is equally important. Usually found on the right-hand page of the Calendar spread (or a dedicated facing page), this is where you list all the tasks you want to accomplish that month, but don't know exactly when. Think “pay annual insurance,” “plan summer vacation,” or “start reading that new book.” Once the month begins, you can migrate these tasks to your Weekly or Daily Logs as you tackle them. I’ve found that if a task is still on my Monthly Task List by the end of the month, it’s either not that important, or I need to break it down further. I typically use a Micron 05 pen for this section, listing tasks with a simple dot (•) before them. I usually allocate about 10-15 lines for this, ensuring I have enough space without the list becoming overwhelming. The entire Monthly Log setup typically takes me about 20-30 minutes to draw out at the beginning of each month. The key is to make it functional. Don't worry about perfect lines; focus on clarity. If you’re short on time, you can even print a pre-made monthly log template!
The Daily Log: Your Everyday Companion
The Daily Log is where the rapid logging really shines. This is your day-to-day record of tasks, events, and notes. Unlike the Monthly or Weekly Log, the Daily Log isn't pre-planned. You create it as you go. At the start of each day (or the night before), you write the date and then begin logging. A task might be “Call Mom,” an event “Doctor's Appointment at 2 PM,” and a note “Idea for new blog post: bullet journal hacks.” As you complete tasks, strike through them. If a task isn't done, you can migrate it to the next day using the arrow symbol (>) or save it for your Weekly/Monthly review. I've tried different approaches here, including dedicating a full page to each day, but I found that often led to wasted space if I had a quiet day. Now, I typically use a half-page or even a third-page for my Daily Log, only adding a new date when the previous one is full. This saves paper and keeps my journal looking less daunting.
For my Daily Logs, I often use a Tombow Dual Brush Pen in a lighter color, like a pastel blue (407) or pink (703), for the date header. Then, I use my trusty Micron 05 black pen for all the rapid logging. The beauty of the Daily Log is its flexibility. Some days might have 20 entries, while others might have only 3. I’ve learned to embrace this ebb and flow. I used to feel guilty if my Daily Log looked sparse, but now I see it as a sign of a well-managed day! My advice is to experiment. Try a full page, then a half page. See what feels right for your rhythm. Setting up a Daily Log on the fly takes literally seconds once you have your symbols down. The real time investment is in the *filling* of it throughout the day, which becomes a habit over time. If you're looking to save time on setup, consider using printable daily log templates that you can just slip into your journal.
The Weekly Spread: Bridging Daily and Monthly
The Weekly Spread is where many people find their sweet spot. It offers more structure than a Daily Log but less commitment than a full Monthly setup. It’s a great way to see your week at a glance and plan your tasks and events in a more organized fashion. There are countless ways to design a Weekly Spread. One popular layout is the “seven days on one page” spread, where you divide a two-page spread into seven vertical columns, one for each day. I used this for about six months. Each column was about 3cm wide, giving me enough space to list a few tasks and appointments for each day. I’d use a Tombow Dual Brush Pen (like 703) for the day headers and a Micron 05 for the entries. This setup typically took me about 15-20 minutes to draw at the start of the week.
However, I found that sometimes a specific day would get incredibly busy, overflowing its 3cm column, while another day might have only a couple of entries. This led to a feeling of imbalance and sometimes frustration. So, I switched to a more flexible layout: a two-page spread where the left page is dedicated to my task list for the week and any notes, and the right page is divided into 7 horizontal rows, each representing a day. This allows me to allocate space dynamically. If Monday is packed, I can use most of the right page for it. If Wednesday is light, it gets just a few lines. This layout also includes a small section at the bottom of the right page for weekly goals or reflections. This version takes me about 25-35 minutes to set up each Sunday evening. I use a mix of Tombow Dual Brush Pens for headers and highlights, and my Micron 05 for the bulk of the writing. The key takeaway is that there's no single “best” weekly spread; it’s about finding what works for *your* schedule and planning style. Don't be afraid to try different layouts until you find your perfect fit!
Collections: Your Dedicated Topic Pages
Collections are essentially any page in your bullet journal that isn't a log. They are dedicated spaces for specific information, ideas, or tracking. Think of them as mini-databases within your journal. I have Collections for everything from “Books to Read” and “Movies to Watch” to “Gift Ideas,” “Recipe Ideas,” and even “Dream Vacation Destinations.” These pages are incredibly useful for consolidating information that might otherwise be scattered across sticky notes or digital apps. For a simple “Books to Read” Collection, I’ll use a two-page spread. On the left page, I’ll write “Books to Read” at the top with a Tombow Dual Brush Pen (perhaps a vibrant 451). Then, I’ll use my Micron 05 to create a list, numbering each book. I might add a small column for the author and genre. This basic setup takes about 10 minutes.
For more elaborate Collections, like a habit tracker or a mood tracker, the setup time will increase. A habit tracker might involve drawing 30 rows (for the days of the month) and columns for each habit you want to track. I tested a 12-habit tracker for a whole month, and it took me about 45 minutes to set up the grid. While visually appealing, I found tracking that many habits consistently was too much for me. I scaled back to 3-4 core habits, which now takes about 15 minutes to set up weekly or monthly. When I first started, I tried to make every Collection a work of art, complete with elaborate doodles and hand-lettering. While beautiful, it was time-consuming and sometimes felt like a barrier to actually *using* the information. Now, I focus on clarity and functionality first, adding decorative elements only if I have the time and inclination. Remember, Collections are for *you* – make them work for your needs, not just for the ‘gram!
Customization and Personalization: Making It Yours
This is where the true power of the bullet journal system lies. It’s not about replicating what you see on Pinterest; it’s about creating a system that genuinely supports your life. I’ve experimented with countless layouts over the years. Early on, I tried a strict vertical daily log, thinking it was the most efficient. However, I’m a big list-maker, and I often found myself running out of space for my daily tasks while having plenty of room for events. A horizontal layout, where days are listed across the top of a page, simply didn’t work for me. I eventually landed on a hybrid approach that combines elements I love from different spreads. My current weekly spread, for example, uses a modified timeline on the left for appointments and a more freeform task list on the right. This took me about 3 months of consistent journaling to figure out through trial and error.
Don't be afraid to mix and match. If you love the simplicity of rapid logging but want a more structured weekly overview, combine them! Use your daily logs for the nitty-gritty and a clean weekly spread to see the bigger picture. Consider your lifestyle. Are you a student with classes and assignments? A parent juggling multiple schedules? A remote worker with project deadlines? Tailor your layouts accordingly. For instance, a student might benefit from a dedicated “Assignment Tracker” Collection, while a parent might need a “Family Meal Planner” spread. I recently saw a fantastic idea from a fellow bullet journalist who uses washi tape to create distinct sections within a single page for different aspects of her day (work, personal, family). This took her about 10 minutes of setup time but made her daily spread incredibly organized. The most important thing is to be honest with yourself about what you'll actually use. If a layout feels like too much work, it probably is. Simplify, adapt, and enjoy the process of creating a journal that’s uniquely yours.
So, how does it all work? It works by being a flexible, analog system that helps you become more intentional with your time and attention. It’s a practice in mindfulness, productivity, and self-discovery. You start with the basics: symbols for rapid logging, collections for specific information, and logs (daily, weekly, monthly) for organizing your time. You customize it to fit your life, experimenting with layouts and finding what truly serves you. My journey from feeling overwhelmed by blank pages to filling over 20 journals has taught me that the bullet journal isn't about perfection; it's about progress. It’s about creating a tool that helps you live a more organized, focused, and fulfilling life. Here are three concrete actions you can take today: 1. Grab a notebook and a pen (any notebook and pen will do!) and start by practicing the basic rapid logging symbols: dot for task, circle for event, dash for note. 2. Dedicate just 15 minutes to setting up a simple monthly calendar view for the upcoming month. 3. Try creating a small collection for something you want to track, like “Ideas for Next Project.” Don't aim for perfection, aim for participation. The most inspiring journals are the ones that are used consistently. My personal recommendation? Pick up a set of Tombow Dual Brush Pens in a few of your favorite colors and a reliable Micron 05 pen. They’ve been my go-to for years, and they make the process of creating beautiful, functional spreads a joy. Now, go forth and journal!
Frequently Asked Questions
What is the most important part of the bullet journal method?
The most crucial element is the concept of rapid logging, which uses simple symbols (like • for task, ○ for event, — for note) to quickly capture information. This forms the backbone of the system, allowing for efficient note-taking and organization across all your logs. Without consistent rapid logging, the system loses its core functionality. It’s about capturing information quickly and efficiently so you can process it later.
Do I need special supplies to start bullet journaling?
Absolutely not! You can start bullet journaling with any notebook and pen you already own. While specialized supplies like Tombow Dual Brush Pens or Micron fine liners are popular for their quality and aesthetic appeal, they are not required. The core method works with basic stationery. Many people start with a simple spiral notebook and a ballpoint pen and gradually invest in supplies as they become more invested in the practice.
How much time does it actually take to bullet journal?
This varies greatly depending on your setup and artistic style. Setting up a basic monthly log might take 20-30 minutes. A weekly spread could take 15-35 minutes. Daily logs are created on the fly and take seconds to set up each day. Decorative elements and elaborate layouts can add significant time. However, focusing on functionality over aesthetics can keep setup time minimal. Many find that the time spent journaling is offset by increased productivity and reduced mental clutter throughout the week.
I’m not artistic. Can I still bullet journal?
Yes, absolutely! The bullet journal method was designed by Ryder Carroll to be a functional tool, not an art project. While many people enjoy adding artistic elements, it is entirely optional. You can create incredibly effective and organized bullet journals using simple lines, basic lettering, and the core symbols. Focus on clarity and usefulness. There are also countless printable templates and stencils available if you want some visual structure without needing to draw it yourself.
Related Posts



Related: Bullet Journal: 5 Essential Bullet Journal Supplies for Beginners
Related Posts
Your Weekly Dose of Inspiration
Journaling ideas, family tips, and gentle inspiration.
Love this content?
Join the BulletJournals.net community for exclusive tips, guides, and updates.
Subscribe Free